Live View
This is the primary user interface.
Channel grid
The center of this page displays the feeds of the cameras that have been activated (in the list to the left).
Click on a channel to select it. A blue outline appears, and the active camera is highlighted in the camera list.
Camera list
To the left of the grid, the system lists all cameras connected to the NVR.
-
Cameras attached directly to the NVR are named with the NVR port number and camera name as customized under Configuration > Camera > OSD Settings.
-
Cameras attached via the network use the camera name as customized under Configuration > Camera > OSD Settings.
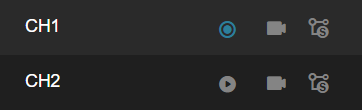
Click the Play/Pause  icon to start/stop streaming the live view of the camera into the selected channel in the grid view.
Click Start Record / Stop Record  icon to toggle recording the surveillance feed. This only works if the camera is assigned to a channel.
Click the feed  icon to select whether the camera sends its main stream or sub-stream to the channel.
Bottom bar
At the bottom left, click  to select the channel layout. If the channel layout is 8 screens or fewer, the feed icon activates; click it to toggle all fields between main and sub streams. If the grid has 9 channels or more, all cameras send their substream.
At the right end of the bottom bar, several icons allow for:
-
 Start All Live View: This loads each connected camera (one by one) into a channel until all channels fill or all cameras are transmitting. Click this again to hide all channels; click once more to return to streaming all video feeds.
 -
 Take picture: This saves a photo of the selected channel.
 -
 Take video: This starts recording all channels in the grid.
 -
 Digital Zoom: Click this, and click and drag in the active channel to zoom the feed to the selection. This icon remains blue as long as any channel has digital zoom active. Click it again to cancel the zoom (if any) for the selected channel.
 -
 Audio/Mute: Toggles surveillance audio for the selected channel.
 -
 Fullscreen: This hides everything but the channel grid. Press Esc to return to the normal view.
Right sidebar
Click the gray carat bar to hide (or extend) the sidebar.
Image settings
When Image settings is selected, Channel displays the number of the camera currently selected in the camera grid area.
The controls below may be deactivated based on the capabilities of that camera; not all cameras support all of these options.
Adjust the sliders and dropdowns to fix the image for the selected channel. You cannot manually edit the values. These settings can also be adjusted in Configuration > Camera > Image.
Click Restore to undo all custom image adjustments.
PTZ
When PTZ is selected, the sidebar displays standard PTZ controls of the PTZ rosette, the zoom/focus/iris buttons, and the speed slider.
Below, choose the button for presets  or patrols
  .
.
Presets
Select a preset. Up to 256 presets (per camera) are supported.
Click the set icon  to save the PTZ's current alignment to the preset.
Click the call icon  to move the PTA to that preset.
Click the trash icon  to select the preset's settings.
Patrols
At the top, select a patrol path. Up to 4 paths are supported.
To create a patrol, click Set. Move the camera through its patrol path. When complete, unclick Set.
Click Call to start the PTZ running through the selected patrol path.